How to Set Up a Bitcoin 2-of-3 Multisig with Hardware Signers 2026
For a 2-of-3 Bitcoin multisig you need 2-3 hardware signers and coordinator software (Sparrow or Nunchuk): create the wallet from device xpubs, back up the wallet descriptor, and verify the receive address on every device. This guide walks through the full operational setup — choosing signers, picking a coordinator, deriving and importing xpubs, generating the multisig wallet, backing up the descriptor (the one mistake that bricks otherwise-recoverable BTC multisigs), and verifying receiving addresses across every device before funding. By the end you will have a working 2-of-3 wallet plus a documented recovery plan that survives a lost device, a lost seed phrase, or a single point of physical compromise.
Introduction
If you have arrived at this page you probably already understand what M-of-N multisig means at the conceptual level — a wallet that requires M signatures out of N total keys to authorise spending, with redundancy built in so the loss of any single key below the threshold cannot move funds. What you want now is to actually set one up on Bitcoin, with hardware signers, the way a careful user would build a long-term cold-storage wallet for material BTC. This guide answers that question end to end. It does not re-explain the conceptual model — the cluster M-of-N mechanics and BTC vs EVM at the mechanism level page owns that. This page goes operational.
The configuration the guide walks through is a 2-of-3 hardware-signer setup. This is the practical default for individual self-custody for one specific reason: it sits exactly at the redundancy point that matters. Lose any one device or seed phrase and you can still spend with the remaining two. Add a fourth signer (a 2-of-4 or 3-of-4) and you have not added meaningful security for an individual user — you have added a coordination cost and another seed phrase to back up. Drop to a 1-of-2 and you have undermined the threshold benefit; drop to a 2-of-2 and you have created a worse-than-single-sig setup where losing either device locks the funds. The 2-of-3 is the disciplined floor and, for most individual users, the disciplined ceiling.
Before you start, calibrate on what this guide is and is not. It is not a thirty-minute task. Budget ninety to a hundred and twenty minutes the first time through. Doing it slowly is the point: every step has a "what happens if you skip this" cost, and two of those costs are catastrophic — lose-all-funds catastrophic — so the guide flags them inline as you reach each one. It is also not a substitute for the single-key baseline. Before multisig is the right framing for you, your day-to-day spending wallet needs to already sit on hardware with verified seed-phrase backups — the single-key baseline is the operational layer this guide builds on.
The structure that follows is a single continuous walkthrough. First, one paragraph on why Bitcoin multisig works differently from EVM Safe multisig at the mechanism level, then directly into the operational steps: choose signers, pick a coordinator, derive xpubs from each device, generate the wallet, back up the descriptor (the BTC multisig footgun that the rest of the cluster keeps stepping around), verify receive addresses, and complete a first spend with a Partially Signed Bitcoin Transaction. By the end you will have a working 2-of-3 wallet plus a recovery plan that survives a lost device, a lost seed, or a single-location compromise. The plan is the point — a multisig you have not recovery-tested is not yet a multisig you can trust.
Why Bitcoin Multisig Differs
Bitcoin multisig and EVM Safe multisig look superficially similar — both require M of N signatures to authorise spending — and differ profoundly at the implementation level. The hub guide covers the contrast at the mechanism level; what matters here is the practical consequence for your setup. Bitcoin multisig is native script-level: the multisig structure is embedded directly in the Bitcoin script that locks each UTXO. There is no smart contract, no on-chain wallet object, no contract address. The wallet exists as a script-defined pattern that any coordinator can recognise if — and only if — it has the descriptor.
The three practical consequences flow from that. First, every signer needs to know the full script structure to recognise its own outputs. The structure is captured in a text artefact called the wallet descriptor (BIP 380-386). Without the descriptor, a signer device sees the same blockchain everyone else does and cannot identify which UTXOs belong to your multisig. Three seed phrases without a descriptor are three single-sig private keys whose corresponding addresses contain none of the funds. This is the asymmetry that drives the entire latter half of this guide.
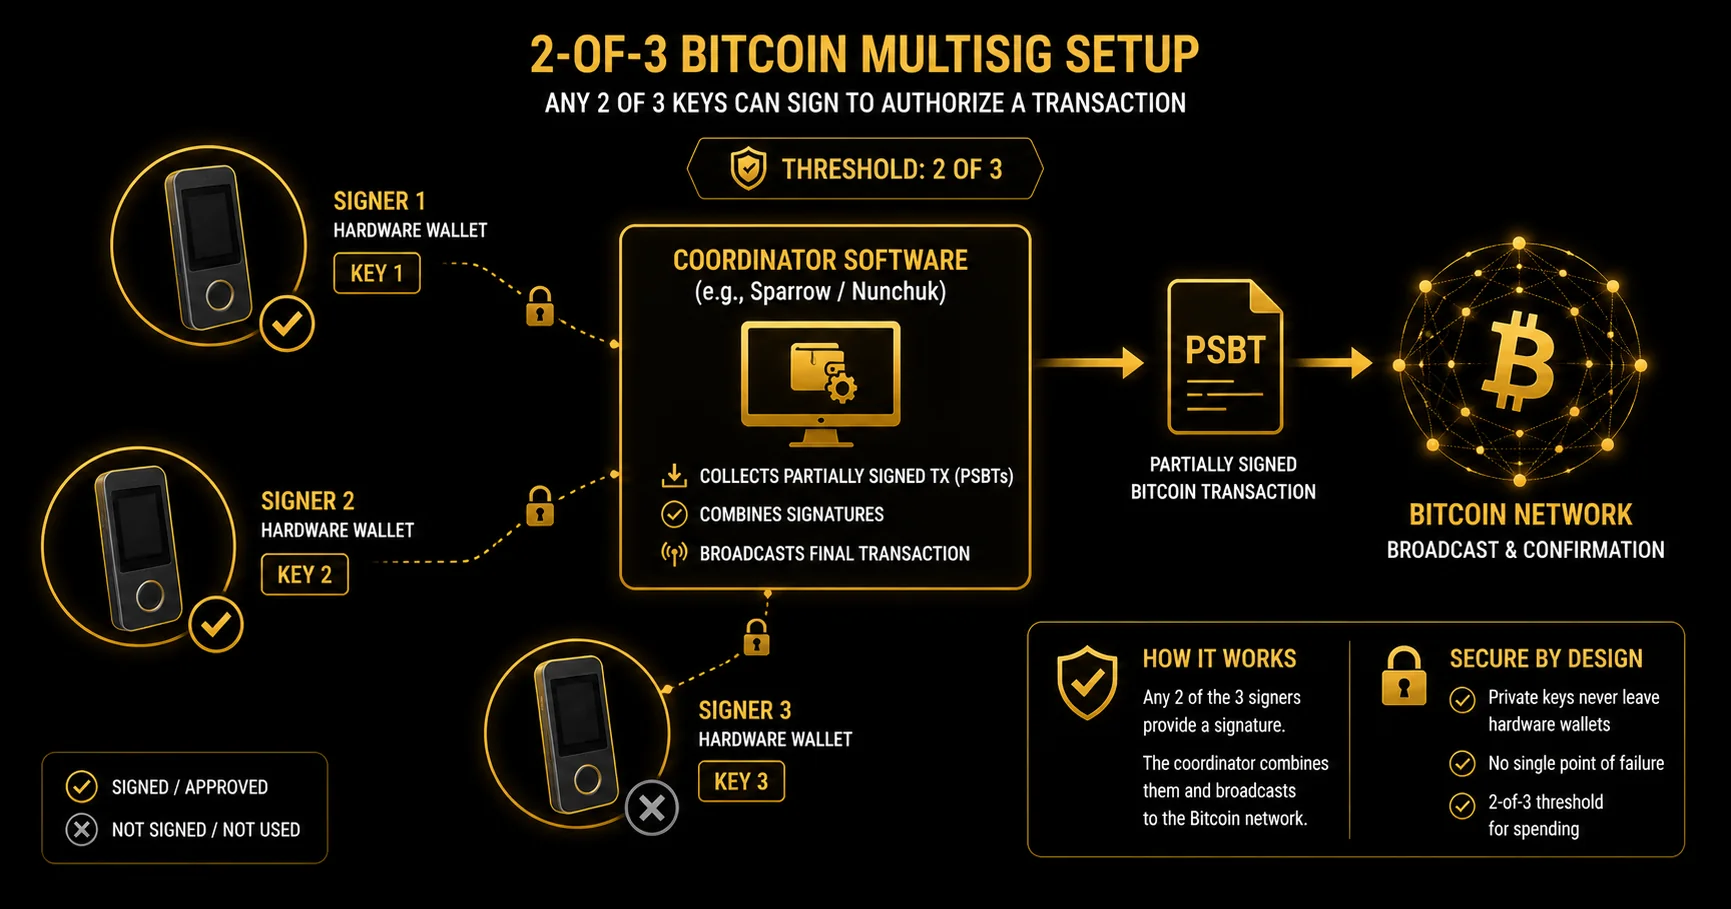
Second, signing happens off-chain in a coordinated dance. Each signer produces a partial signature for a Partially Signed Bitcoin Transaction (PSBT, BIP 174), then the coordinator assembles the partial signatures and broadcasts the completed transaction. There is no shared on-chain wallet UI for everyone to log into; the coordination happens through PSBT files that move between signers via QR codes, USB, microSD cards, or air-gapped channels.
Third, Taproot (P2TR) multisig produces transactions indistinguishable from single-sig on-chain because the script footprint is collapsed into a single Taproot key path. The privacy and fee implications are non-trivial: a Taproot 2-of-3 multisig spend looks identical to a 1-of-1 spend to any chain observer, which is both a privacy win and a smaller-on-chain-footprint fee win. P2WSH (SegWit multisig) is the predecessor — well-supported, well-tested, slightly larger on-chain. Either is a defensible 2026 choice; the trade-off appears later in this guide when you pick a script type during wallet creation.
What this means for your setup is that the operational stack — hardware signer, coordinator software, descriptor backup, address verification — is doing more work on Bitcoin than the equivalent EVM stack would. EVM multisig outsources state to the contract. Bitcoin multisig keeps state in your hands. The rest of this guide is about how to handle that responsibility competently.
Choose Your Signers
The first decision is the device list. A 2-of-3 multisig needs three independent signers, and "independent" is the load-bearing word. Independence means three separate physical devices, ideally from three separate vendors, ideally with three separate secure-element architectures, ideally with three different attack surfaces (USB vs Bluetooth vs air-gapped QR). The whole point of M-of-N is that compromising one signer leaves the threshold intact; the more genuinely independent your three signers are, the more that property holds in practice rather than on paper.
Hardware-only — the non-negotiable
Software signers running on mobile wallets or hot desktop wallets sit on internet-connected devices that share an attack surface. A 2-of-3 with two hot signers and one hardware signer is operationally a hot wallet — if an attacker compromises your laptop they have access to both hot signers, which is two of three keys, which clears the threshold. The whole reason to choose multisig over a well-backed-up single-sig is to put each key on a separate attack surface that an attacker would have to compromise independently. Software signers collapse that property and should not appear in a serious 2-of-3 setup.
Vendor diversity — defence in depth
Three identical Trezor Safe 7 devices give you a multisig that survives one device loss, but they all share one supply chain, one firmware codebase, and one secure-element design. A firmware vulnerability in that vendor's product line — or a supply-chain compromise upstream of the device you bought — collapses the diversity benefit. The disciplined pattern is three different vendors, or at minimum two different vendors with materially different secure-element designs. The cost is a slightly heavier learning curve (three device UIs to learn rather than one) and the benefit is genuine defence in depth against single-vendor failure.
Suggested 2-of-3 device combinations
The combinations below are qualitative recommendations, not rankings — the right answer for a given setup depends on the user's familiarity with each device and the threat model. The first combination is the disciplined default: Keystone 3 Pro + Trezor Safe 7 + Coldcard Mk5. Three vendors, three secure-element designs, three different communication surfaces (QR for Keystone, USB for Trezor, microSD for Coldcard). Coldcard is Bitcoin-only and air-gapped by default; Keystone is air-gapped via QR; Trezor uses USB with a fully auditable TROPIC01 secure element on the Safe 7.
The second combination, Keystone 3 Pro + Trezor Safe 7 + a Ledger device (Nano X, Stax, or Flex), trades Coldcard's Bitcoin-only specialisation for broader vendor familiarity. This is the right combination for users who already own a Ledger and want to bring it into the multisig set; it gives you three different communication surfaces (QR, USB, Bluetooth-or-USB) and three different vendor codebases. The Ledger Nano S is deliberately omitted from buy-recommendations because it has been discontinued for new purchases; existing units continue to function but should not be the device a new buyer plans around.
A two-vendor fallback — Keystone 3 Pro + Trezor Safe 7 + a second Trezor — is acceptable when budget or shipping availability rule out a third vendor. It is strictly weaker than a three-vendor setup on the supply-chain axis but still vastly stronger than single-sig. If you go this route, treat the two Trezors as effectively one signer for supply-chain purposes and keep them in different physical locations to preserve the geographic-independence property.
One product family is explicitly out of scope for this section: Tangem's multi-card system is wallet redundancy (the same key cloned onto multiple cards), not M-of-N multisig with independent keys. It is a useful product for single-sig users who want device redundancy without managing seed phrases on metal, but it does not meet the independence definition this section is built around. If you see Tangem listed as a "multisig signer" anywhere, it is a misuse of the term — Tangem is a key-redundancy product, not a true M-of-N signer.
Coordinator Setup — Sparrow vs Nunchuk
The coordinator is the software that ties your hardware signers into a single wallet view. It does not hold any private keys — every signing operation happens on the hardware devices — but it does build the PSBTs that move between signers, assemble partial signatures into completed transactions, and (critically for the next section) display and export the wallet descriptor. Two open-source coordinators dominate the Bitcoin multisig space in 2026: Sparrow and Nunchuk. Pick one for your setup; this guide walks the rest of the procedure in Sparrow because the descriptor flow is more pedagogically visible there, but the conceptual steps translate to Nunchuk one-for-one.
Sparrow
Sparrow is an open-source desktop Bitcoin wallet maintained by Craig Raw, currently shipping in the v2.x series with Taproot support. It is a power-user tool by default: fine-grained UTXO and coin-control views, descriptor visibility in plain text in the wallet settings, configurable backend (your own Bitcoin node, or Sparrow's bundled Electrum-protocol servers), and an explicit display of the BIP standards in play for any given wallet. The trade-offs are familiar: desktop-only, a steeper learning curve than a mobile app, and no companion mobile app for on-the-go reference. For a careful first-time multisig user who wants to actually understand what the coordinator is doing, Sparrow's transparency is a feature, not a friction.
Nunchuk
Nunchuk is a Bitcoin multisig app available on both mobile and desktop, also open-source and no-KYC. The free tier covers personal multisig fully; paid tiers add collaborative-custody features such as shared-vault management and assisted recovery (qualitative price range in the low hundreds of dollars per year — verify against the current pricing page before committing). Nunchuk's strengths are cross-device sync (mobile plus desktop), an easier on-ramp for users who do not want a desktop power-tool, and group-custody features that scale up gracefully if you later expand from personal multisig to a family or organisational setup. The trade-off is that the sync features rely on Nunchuk's infrastructure — you can run the app fully offline, but the UX is built around sync and asks for more trust in the service if you use it that way.
Pick one for the walkthrough — Sparrow
The rest of this guide uses Sparrow for three pedagogical reasons. Sparrow shows you the wallet descriptor in plain text in the wallet settings, which makes the descriptor-backup section directly hands-on rather than abstract. Sparrow's defaults expose the BIP standards in play — P2WSH, sortedmulti, BIP 48 derivation paths — which gives you visible anchors for the concepts as you encounter them. And Sparrow's screenshot-free written walkthrough translates more cleanly than a mobile-first UI where layout and screen positions shift between phones. If you prefer Nunchuk, the conceptual steps are identical; the UI labels and screen positions differ, and the descriptor-backup discipline applies equally in both tools.
Install and verify
Download Sparrow from the official source — https://sparrowwallet.com/ — and never from a search-engine result. Phishing on wallet software is a real and ongoing attack class: typosquatted domains serving signed-but-malicious binaries have hit Bitcoin users repeatedly across the last several years. Type the URL directly or follow a verified bookmark; do not click a search result. After downloading, verify the release signature against Craig Raw's PGP signing key before opening the binary. Sparrow publishes the signing key on the download page along with detailed verification instructions; the procedure is a one-line discipline once you have the key imported.
Creating the Wallet from xpubs
With Sparrow installed and your three hardware signers in hand, the wallet creation flow runs in five operational steps. The walkthrough below renders the procedure as numbered prose rather than a checklist because each step has nuance that a one-line bullet would flatten — the order matters, the timing matters, and the verification at each stage matters more than the click-by-click sequence.
Step 1 — initialise and back up each signer individually. Before any multisig wallet exists, each hardware device generates and stores its own seed phrase. Run the initialisation flow on each device separately: generate the seed on-device (never input a seed produced elsewhere), confirm the words on the device screen, and back up each seed independently on metal — or at minimum on paper if metal is out of budget for the first pass, with a metal upgrade planned in the immediate future. The order matters: seeds first, xpubs next, wallet last. A device whose seed is not yet backed up should not be participating in xpub export, because a device that fails between seed generation and seed backup loses its key.
Step 2 — export the multisig xpub from each signer. Each device exposes an "export xpub" or "multisig xpub" flow specific to its UI. On Keystone 3 Pro the flow is: navigate to the multisig settings, choose the multisig xpub export option, and present the resulting QR code to Sparrow's camera or QR-import flow. On Trezor Safe 7 the flow is: connect to Sparrow via USB, allow Sparrow to read the multisig xpub directly from the device through Trezor Bridge. On Coldcard Mk5 the flow is: export the multisig xpub to microSD as a JSON file containing the xpub plus the BIP 48 derivation-path metadata (the canonical path for P2WSH mainnet multisig is m/48'/0'/0'/2'), then insert the microSD into your Sparrow machine and import.
Step 3 — assemble the wallet in Sparrow. Open Sparrow and choose File → New Wallet → Multi Signature. Set the threshold to 2 of 3. Add each xpub by importing from the corresponding source: QR from Keystone, USB from Trezor, microSD JSON from Coldcard. Sparrow auto-detects the script type from each xpub's derivation path and will warn you if the paths are inconsistent across signers — for example, mixing a BIP 48 P2WSH xpub with a BIP 84 single-sig xpub. Resolve any path inconsistencies before continuing; mixing paths at this stage is one of the silent ways a multisig setup goes wrong.
Step 4 — choose the script type explicitly. P2WSH (SegWit multisig) is the safe 2026 default — universally supported by every modern signer and coordinator, well-tested over years of production use, with reasonable on-chain fees. P2TR (Taproot multisig) is the forward-looking option that produces transactions indistinguishable from single-sig on the chain, with a smaller on-chain footprint and lower fees. Choose P2TR only if you have verified Taproot multisig support across every signer-and-coordinator combination in your set; the support matrix is still maturing, and a Taproot multisig that one of your signers cannot co-sign is an unrecoverable wallet. If in doubt for a first multisig, pick P2WSH. You can migrate to Taproot in a future wallet rotation once the support matrix is uniformly mature on your specific stack.
Step 5 — name the wallet and save. Choose a descriptive name (for example "Personal 2-of-3 Cold Storage 2026") that future-you will recognise on a restored Sparrow profile. Save the wallet. At this point Sparrow generates and displays two artefacts: a first receive address (do not use it yet — address verification on every device happens in a later section) and the wallet descriptor in plain text in the wallet settings. That descriptor is your single most important backup artefact, and the entire next section is about how to handle it.
One calibration note before you continue. This is not a five-minute step. Expect thirty to forty-five minutes the first time through if you have not used the specific devices before — Keystone's QR flow, Trezor's USB pairing, Coldcard's microSD shuffle each take their own time, and the first run through each is materially slower than the second. Resist the urge to rush. Every signer must be operational and tested before you fund the wallet, and "tested" specifically means having successfully exported its xpub into the coordinator and confirmed the resulting wallet descriptor matches what you expect. If anything looks wrong at this stage — a missing xpub, a mismatched derivation path, a script-type warning — stop and resolve it. Do not fund a wallet whose creation flow you do not understand.
Descriptor Backup — the BTC Multisig Footgun
This is the deepest and longest section of this guide, and the entire reason the page exists. If you internalise nothing else from this walkthrough, internalise the descriptor backup discipline: lose the descriptor and you cannot recover the wallet, even with all three seed phrases intact. This is the highest-frequency Bitcoin multisig failure mode at the long tail, far more common than spectacular hacks, and almost entirely preventable with a discipline that takes a few hours to set up once and survives indefinitely afterwards.
Why three seeds without the descriptor are unrecoverable
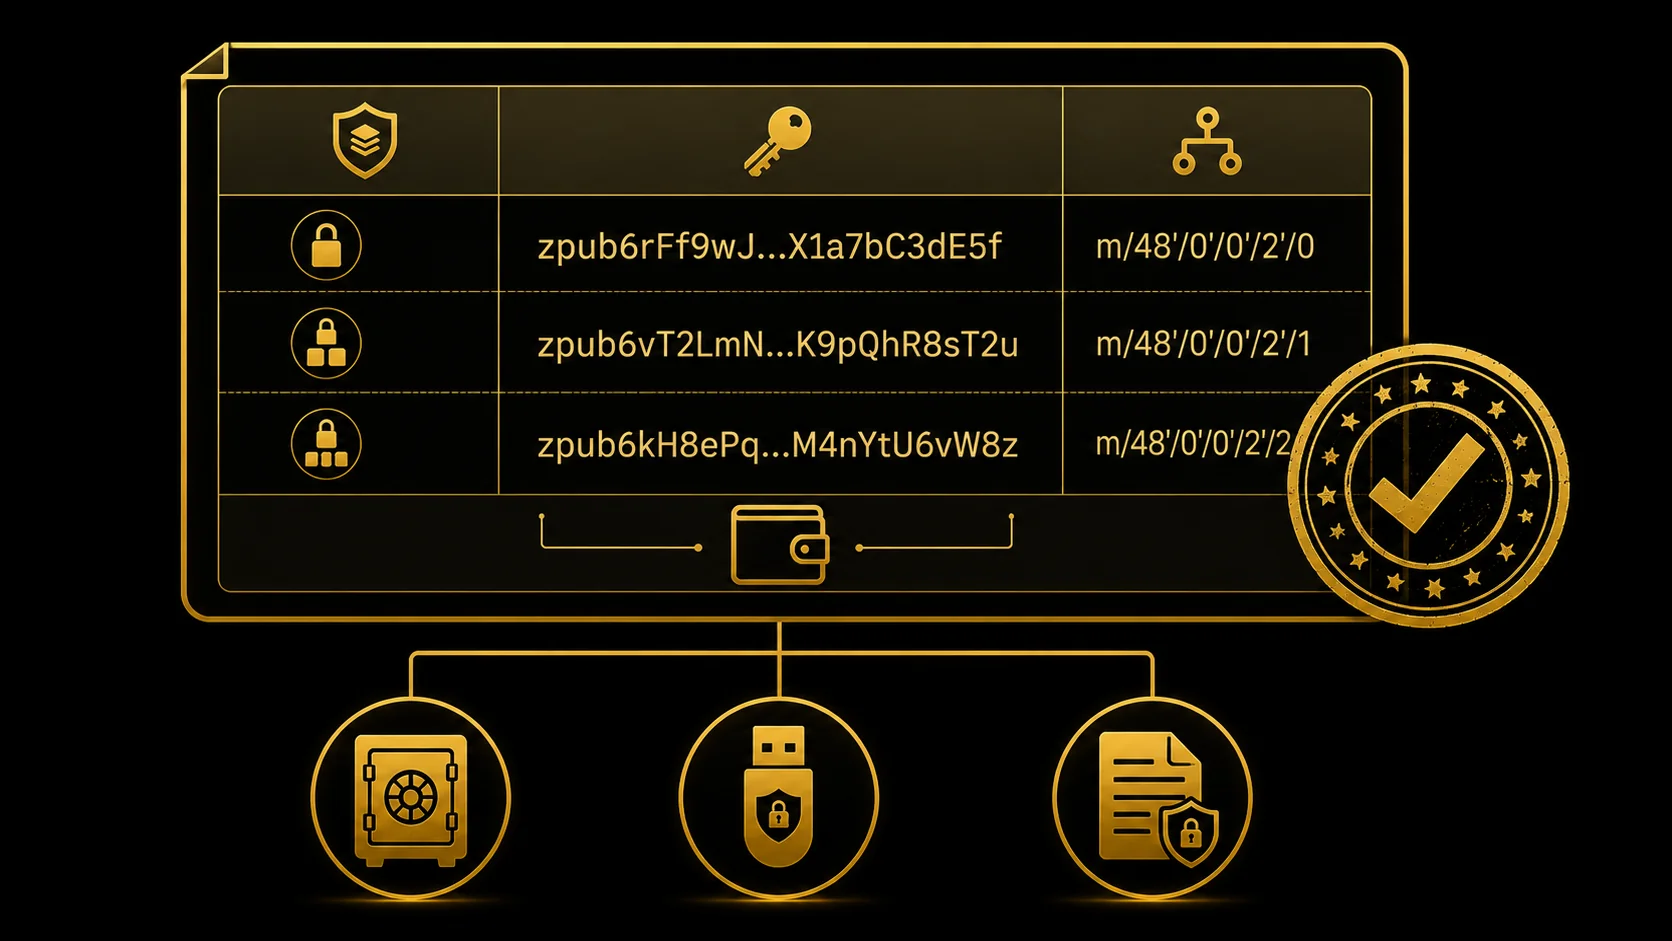
A Bitcoin multisig wallet is defined by the combination of five parameters. The script type — P2SH (legacy), P2WSH (SegWit), or P2TR (Taproot) — determines the on-chain script that locks each UTXO. The participating extended public keys (xpubs), one from each signer, supply the public components of the keys that can sign. The threshold value M tells the network how many signatures are required. The derivation paths used by each signer (BIP 48 for most multisig, with chain-specific subpaths) determine which child keys the wallet generates from each xpub. And the xpub ordering convention determines, in non-sortedmulti setups, which xpub is "first" in the script — and different orderings produce different addresses for the same set of keys.
Without the descriptor, possessing all three seed phrases gives you all three private keys but not the script structure they collectively lock UTXOs into. The seeds spawn correctly into single-sig wallets at the default BIP 84 paths; those single-sig wallets contain nothing because the multisig UTXOs sit on the chain locked into scripts whose structure you would have to brute-force to identify. In some pathological cases — a 2-of-3 P2WSH at the canonical BIP 48 path with sortedmulti and no exotic configuration — a determined recovery operator with all three seeds could reconstruct the wallet by trying every standard variant. In the vast majority of cases, the parameter space is wide enough that recovery is infeasible. The funds exist. The keys exist. The wallet structure that connects the two does not, and that is the entire failure.
What the descriptor actually looks like
In Sparrow, navigate to Settings, choose your multisig wallet, and open the Settings tab — the wallet descriptor appears in plain text. For a sorted-multisig P2WSH 2-of-3 it reads roughly as wsh(sortedmulti(2,xpub6FA...,xpub6FB...,xpub6FC...)), with each xpub fully expanded to its eighty-or-so-character form. The wsh prefix means P2WSH (witness script hash, SegWit). The sortedmulti wrapper means BIP 67 sorted multisig — xpubs sorted lexicographically before address derivation, so the import order in the coordinator does not become part of the wallet's identity. The 2 is the threshold. Each xpub is one signer's public key for the multisig derivation path.
You will also see Sparrow's export options for the descriptor. File → Export Wallet → Output Descriptor saves a JSON file that contains the full descriptor plus metadata (wallet name, creation date, script type, signer count). Sparrow also offers a printable backup sheet that includes the descriptor in human-readable form alongside other recovery metadata — useful for offline storage. Note that the descriptor is not secret. Knowing the descriptor does not let an attacker spend funds, because spending still requires M of N private keys. A descriptor that fell into an attacker's hands gives them the ability to identify which UTXOs belong to your wallet and to monitor them on-chain, which is a privacy loss but not a custody loss. This means the descriptor can be stored alongside non-secret recovery information without expanding your attack surface in the way that a leaked seed phrase would.
Where to store the descriptor
The disciplined storage pattern has four properties: multiple physical copies, geographic separation, durable media, and at least one machine-readable copy. The descriptor is long — typically several hundred characters once xpubs are expanded — so memorisation is not realistic and abbreviation is risky. Steel backups designed for seed phrases can carry an abbreviated descriptor (first and last eight characters of each xpub, plus the script type and threshold) that is verifiable against the full descriptor if recovery is required. Encrypted digital backups are acceptable and recommended: a copy in your password manager (1Password, Bitwarden), a copy in encrypted cloud storage, and a physical copy in an off-site location together form a defensible setup. The household-fire test is the calibration: if your house burns down tonight, can you (or a beneficiary you have prepared) reconstruct the wallet from off-site resources within thirty days? If the answer is no, your descriptor backup is incomplete.
How to export the descriptor in practice
The mechanical procedure in Sparrow is short: File → Export Wallet → Output Descriptor produces a JSON file you can store anywhere. The print option produces a sheet you can store in physical form. The Settings → wallet → Settings tab shows the descriptor in copyable plain text. The discipline is to do all three: save the JSON to encrypted cloud storage, save the JSON to a hardware key (a small encrypted USB drive) in a separate physical location, and save the printed sheet to a third location. Nunchuk follows an analogous flow with different menu paths; the conceptual structure — settings, copy or export descriptor, save to multiple locations — is the same.
Recovery dry-run — the discipline that proves your backup works
Before funding the wallet with any material value, perform a recovery dry-run. This is the single most important verification step in the entire setup, and the one most users skip because the wallet "looks right" in the coordinator they just configured. The procedure is short. Close Sparrow. Rename or move your Sparrow data directory aside so that Sparrow launches with a clean profile (or use a fresh Sparrow installation on a separate machine). Import the descriptor file you just saved. Confirm that Sparrow rebuilds the same multisig wallet with the same name, the same xpub set, the same script type, and — most importantly — the same first receive address as before. If the receive address matches character-for-character, your backup is complete and you understand the restore procedure. If it does not match, something is wrong with the descriptor file or with your understanding of the restore flow, and you have caught the problem before funding rather than after.
Repeat this dry-run every twelve months as part of an annual security review. Descriptor format conventions evolve, coordinator versions ship breaking changes, and a backup you have not tested in three years is a backup whose restoreability you are assuming rather than verifying. An annual repetition keeps the procedure in your hands — not in a manual, not in a memory of "I did this once" — and surfaces drift before drift becomes a problem.
Receiving and Verifying Addresses
The wallet exists, the descriptor is backed up, the recovery dry-run has confirmed the descriptor restores correctly. Before you send any Bitcoin to this wallet, one verification step remains: confirm that the first receive address Sparrow generates is the same address that every hardware signer independently derives from the descriptor. The check takes a few minutes and defeats an entire class of attacks that no other discipline in this guide catches.
Why address verification matters
Sparrow displays an address. That address is correct if Sparrow is uncompromised, if the descriptor it loaded is the descriptor you saved, and if no malware on your machine has substituted bytes between Sparrow's output and your screen. Any one of those assumptions could fail without you noticing. The hardware signers, by contrast, derive the address independently from their own xpub plus the descriptor they were given during wallet creation. If all three signers show the same address as Sparrow, the address is real — three independent derivations have converged on the same answer, and an attacker would need to compromise all three signers plus Sparrow simultaneously to substitute a different address everywhere at once. That convergence is the strongest available proof that the address you are about to fund is the address that your multisig actually owns.
The verification procedure
Sparrow exposes a "Display Address" function from the receive tab. For each hardware signer connected to the wallet, choose the signer and ask Sparrow to send the address to the device for confirmation. On Keystone the address renders as a QR code and a string on the four-inch screen; verify the string matches Sparrow's display character-by-character. On Trezor the address displays on the device screen; verify the string matches. On Coldcard the address displays on the device screen and (for some models) can be exported back via microSD for offline cross-check; verify the string. If any one of the three devices shows a different address from what Sparrow displays, stop everything and investigate before funding. A divergence at this step almost certainly indicates a coordinator compromise or a descriptor mismatch, and funding a wallet whose address you cannot independently verify is the operational definition of trusting software you have no reason to trust.
Subsequent receives
Sparrow generates a new address for each receive. For high-value receives (a qualitative threshold somewhere in the ten-thousand-dollar range is a reasonable starting point, scaled to your individual risk tolerance), repeat the verify-on-every-device procedure in full. For smaller routine receives, verifying on at least one device per transaction is the practical floor — pick one device per receive, rotate which device you verify on across receives so that no single device's display becomes a single point of trust. A verification cadence that scales with transaction value is the right pattern; verifying every address on every device for a five-dollar receive is unsustainable, and verifying no address for a fifty-thousand-dollar receive is reckless.
Sparrow and each hardware signer have purpose-built "verify address on device" flows for exactly this reason. Use them. Do not skip them because the first three addresses you verified were correct — address-substitution attacks work by patient waiting, then activating on a high-value send. The discipline is to assume substitution is possible and to verify often enough that the assumption is checked rather than trusted. The whole reason hardware signers have screens is to make the substitution observable; treating the screen as decorative defeats the device's purpose.
Spending with PSBT
The wallet is funded. The descriptor is backed up across three locations. The first receive address was verified on every device. The next operational step is your first spend, and the spending flow on a Bitcoin multisig is fundamentally different from a single-sig spend because of one artefact: the Partially Signed Bitcoin Transaction, or PSBT, defined by BIP 174. A PSBT is a structured file that carries a transaction draft plus zero or more partial signatures; each signer adds its signature to the same PSBT, and the coordinator finalises the transaction once the threshold is met. The flow is sequential, not parallel — one signer at a time — and the file moves between signers via QR codes, USB connections, or microSD cards depending on each device's interface.
The five-step spend flow
Step 1 — construct the transaction in Sparrow. From the Send tab, set the recipient address, set the amount, set the fee rate (Sparrow shows current network fee estimates). Optionally use Sparrow's coin-control view to choose specific UTXOs rather than letting the wallet pick automatically. When you click Create Transaction, Sparrow produces an unsigned PSBT — a file with the transaction structure populated and zero signatures attached.
Step 2 — sign with signer one. Load the PSBT onto the first signing device through its native interface: scan the QR code on Keystone, plug Trezor into the Sparrow USB port, save the PSBT to microSD and insert into Coldcard. The device parses the transaction and displays the details on its own screen: recipient address, amount, fee, change address. Verify each field on the device screen before approving. Read the recipient address character-by-character against the address you intended to send to — first four and last four is not enough, because vanity-address attackers generate matches at both ends. Verify the amount. Verify the fee. For the change address, confirm it belongs to your wallet by checking it against Sparrow's change-address display (Sparrow shows which addresses are internal change addresses). Approve. The device outputs a partially-signed PSBT — back via QR, USB, or microSD to Sparrow.
Step 3 — sign with signer two. Repeat the same procedure with the second signing device. The PSBT now contains two of three signatures — the threshold is met. The third signer is uninvolved in this transaction; its key remains cold. Sparrow finalises the PSBT into a complete transaction and broadcasts it to the Bitcoin network. The transaction appears in your wallet as pending, then confirms with one block, then accumulates confirmations.
Step 4 — confirm on-chain. Watch the transaction confirm in Sparrow (or via a block explorer). The first confirmation typically arrives within ten to thirty minutes depending on network congestion and your chosen fee rate. The transaction is final after six confirmations by the usual Bitcoin convention, which takes around an hour. Your wallet balance updates as the transaction confirms.
Step 5 — rotate signers across spends. Your 2-of-3 has three operational pairs (signers 1 and 2, signers 1 and 3, signers 2 and 3). Rotating which pair you use for routine signing exercises all three devices over time and confirms that no single device has silently failed — a Coldcard with a degraded screen, a Keystone with a depleted battery, a Trezor with an outdated firmware that no longer reads the latest Sparrow PSBT format. The third device should also participate in periodic exercise signings (small-value spends that you cancel before broadcasting, or transactions to an internal address) even when not strictly needed for the threshold, so that you discover device failures during a low-stakes moment rather than during a recovery emergency.
Verification discipline as the operational invariant
The single thread running through every section of this guide — descriptor backup, address verification, transaction-detail verification on every signing device — is the same operational invariant: the hardware device's screen is the source of truth, and everything else is convenience. The coordinator is convenience. The laptop is convenience. The signing UI is convenience. The hardware screen is where you decide whether to approve. For a fuller treatment of this discipline applied across the broader self-custody stack — device hygiene, signer-onboarding procedures, firmware-update cadence — the C4 hardware-wallet hub covers transaction-detail verification on hardware signers end-to-end (see the related-resources list below).
Conclusion
A 2-of-3 Bitcoin multisig is a meaningful security upgrade over single-sig only if the operational discipline holds. The discipline is six items, each of which appears in the walkthrough above. Hardware-only signers, with no software signers diluting the attack-surface independence the threshold model depends on. Vendor diversity across the signer set so that a single firmware disclosure or supply-chain compromise cannot collapse the multisig back to a single trust root. Sorted-multisig P2WSH as the safe 2026 default for the script type, with Taproot reserved for setups where every signer-and-coordinator combination has been verified to support it. Descriptor backup as the top operational priority, in at least three locations across two media types, with an annual recovery dry-run that confirms the backup actually restores. Address verification on every signing device for the first receive and every high-value receive thereafter. And transaction-detail verification on every signing device for every spend, no exceptions, no shortcuts on routine transactions, because routine is exactly when the address-substitution attack waits to activate.
The honest framing matters. A 2-of-3 with all three seeds in one safe and the descriptor only on a laptop is multisig in name and single-sig in practice — worse, in fact, because the additional coordination complexity has bought nothing in exchange for the extra setup time. A 2-of-3 with three independent vendors, geographically separated seeds, a descriptor backed up across three locations, an annual recovery test, and verification discipline on every signing flow is the setup that actually delivers the redundancy property multisig promises. The difference between the two is not the technology — it is the discipline. The technology is identical; the operational practice is what makes the multisig real.
Three forward links close the loop. The multisig security risks and mistakes page covers the failure modes that this discipline is designed to prevent, including the descriptor footgun in its full taxonomy alongside blind signing, coordinator compromise, and address-verification gaps. The multisig wallets complete guide covers the conceptual model of M-of-N and the BTC-versus-EVM mechanism contrast in full. For the EVM-side equivalent of this walkthrough — Safe deployment, owner-set configuration, and clear-signing discipline at the Safe{Wallet} level — see the Ethereum multisig Safe guide.
Sources
- Sparrow Wallet — official site: primary citation for the desktop coordinator used throughout the walkthrough, including the release-signature verification step, descriptor display in plain text, and the wallet-creation flow.
- Sparrow Wallet GitHub: source code, release history with PGP-signed manifests, and active-development signal referenced in the coordinator-setup section.
- Nunchuk — official site: alternative Bitcoin multisig coordinator referenced as the mobile-first option for users who prefer a cross-device sync UX over Sparrow's desktop-only power-tool approach.
- Keystone Guide — Bitcoin multisig with Nunchuk: practical walkthrough cross-reference covering the Keystone multisig xpub export flow referenced in the wallet-creation section.
- BIP 174 — Partially Signed Bitcoin Transaction format: canonical specification for the PSBT format that carries the multisig spending flow across signers, referenced throughout the spending-with-PSBT section.
- BIP 380 — Output Script Descriptors: canonical specification for the wallet descriptor format that the descriptor-backup section centres on; BIPs 381 through 386 cover specific descriptor flavours.
- BIP 67 — Lexicographical indexing of public keys (sortedmulti): the sorted-multisig convention that removes xpub-ordering from the wallet identity, used by Sparrow as the default for new multisig wallets.
- Coldcard official documentation: multisig setup section covering the BIP 48 derivation paths and the microSD-based xpub export flow referenced for Coldcard Mk5 as the third signer in the suggested device combination.
- Trezor official site: manufacturer documentation for the Trezor Safe 7 used as the USB-side signer in the vendor-diverse 2-of-3 combinations recommended in the choose-your-signers section.
Frequently Asked Questions
- Do I need three hardware wallets or can I use two?
- A 2-of-3 multisig needs three independent signers to deliver its redundancy benefit. With three devices you can lose any single one and still spend; with two devices you have a 2-of-2 setup where losing any single device locks the funds, which is operationally worse than a single-sig wallet plus a clean backup. If three hardware signers are out of budget, prefer single-sig on hardware with disciplined seed-phrase distribution over a 2-of-2 multisig — the threshold benefit only appears at 2-of-3 and above.
- What is the difference between a descriptor and a seed phrase?
- A seed phrase is one signer's private key, in the form of twelve to twenty-four words. A wallet descriptor is the structure that ties seeds together: the script type (P2WSH for SegWit, P2TR for Taproot), the threshold (the M in M-of-N), all participating xpubs, and the derivation paths each signer uses. You need both to recover a multisig wallet — the seeds let you sign, the descriptor tells the software what to sign for. Three intact seed phrases without the descriptor produce three single-sig wallets that own none of the multisig UTXOs.
- Can I use the same seed phrase across multiple multisigs?
- Technically yes — each multisig wallet derives keys at a different derivation path, so a single seed can participate in many distinct multisigs without address collisions. Practically discouraged. A seed compromise in any one of those multisigs compromises that key everywhere it appears, which collapses your defence-in-depth. The disciplined pattern is one seed per signer per multisig role; if you operate two multisigs (e.g. personal and family), use distinct hardware devices and distinct seeds.
- Should I use Taproot multisig or stick with P2WSH?
- P2WSH (SegWit multisig) is the safe 2026 default. Every modern hardware signer and every mainstream coordinator supports it, and the script type is well-tested across the ecosystem. P2TR (Taproot multisig) is the forward-looking option — smaller on-chain footprint, lower fees, and multisig transactions that look identical to single-sig on the chain, which is a privacy win. The trade-off is verification: confirm Taproot multisig support across your specific signer-plus-coordinator combination before committing, because the support matrix is still maturing. If in doubt for your first multisig, pick P2WSH and migrate to Taproot in a future refresh.
- What is sortedmulti and should I use it?
- Sortedmulti is the BIP 67 convention that sorts xpubs lexicographically before deriving addresses. Without sortedmulti, the order in which you imported xpubs into the coordinator becomes part of the wallet's identity — swap two xpubs and you get a different address set with the same keys. Sortedmulti removes that ordering footgun: the same three xpubs produce the same wallet regardless of import order. Use it. Sparrow defaults to sortedmulti for new multisig wallets, and the descriptor format makes this explicit with the wsh(sortedmulti(...)) prefix.
- How often should I test my recovery?
- Once before funding, then every twelve months. The pre-funding test is mandatory: wipe a Sparrow profile, import the descriptor file, and verify the same wallet appears with the same receive address on a clean install. The annual repeat catches drift — coordinator versions evolve, your descriptor format may have aged, and the practice keeps the procedure in your hands rather than locked in a manual. A backup you have not tested is not a backup; it is an assumption.
- What happens if one of my hardware signers fails or is lost?
- In a 2-of-3, losing one signer does not lock the funds — the remaining two devices still meet the threshold. Replace the failed device by initialising a new hardware signer, exporting its new xpub, constructing a new 2-of-3 multisig wallet that swaps the lost xpub for the replacement, and moving funds from the old wallet to the new one via a single PSBT signed by the two surviving devices. Funds never leave your control during the rotation. Document this procedure in writing before you need it — the moment of device loss is not the moment to learn the recovery flow.
← Back to Crypto Investing Blog Index
Financial Disclaimer
This content is not financial advice. All information provided is for educational purposes only. Cryptocurrency investments carry significant investment risk, and past performance does not guarantee future results. Always do your own research and consult a qualified financial advisor before making investment decisions.